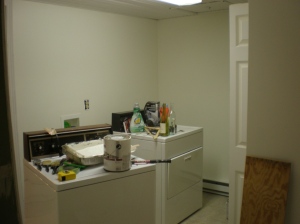
If you’ve been keeping up with the laundry room progress you know that we went from reject purple to preschool lime green within a weekend. If you haven’t been keeping up, check out our earlier post to hear the rest of the story.
Alex is one of the kindest, big hearted people I have ever met. I knew we had a color disaster on our hands when he said “There just isn’t any other way to say – it looks awful.” I went straight to the fridge and grabbed the primer roller and began erasing that hideous color. So, within 48 hours I had primed and painted the space twice. I wasn’t so much upset that I was back to square one with the room, but I was upset that I hadn’t gone with my gut instinct on my original color choices. Sure, I’m the worst person east of the Mississippi at picking out movies, but I’ve had a pretty good history with paint color (Mom was right, always go with your gut.). As soon as I put the primer roller back in the fridge (just in case), I made an impatient trip to Wally World. It was about 11:00p.m., Lowe’s was out of the question, and my perfectionist nature had taken over. Although, the Wally does have some el cheap’ o paint, they do carry a few decent brands like Kilz and we are talking about the laundry room after all, I’m the only one that spends any length of time in there.

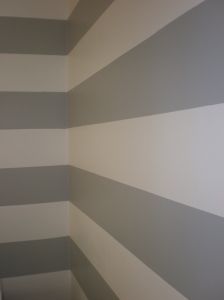
Since I knew I was going with something similar to my original selections – cool grays and neutrals- it didn’t take me long to make my choices. Base coast – Clean and Crisp; Stripes – Khaki Taupe. I was in and out as about as fast as you can get in and out or our Wal-Mart. By the time I returned with my new paint selections the primer had dried and I got straight to work. Before I was even finished I knew that Clean and Crisp was p-e-r-f-e-c-t.

I was pumped! Things were going in a much better direction. Now all we had to to was mark and tape off our stripes. Easy Jeezy (rap singing). Depending on how well you know me, you may know that I am a math reject to the max. Luckily, though I had “being better at math than I am” as one of my marriage requirements and Alex is a little mathematician. I had checked at Young House and the had a “how to” devoted to painting stripes. Perfect! I may have mentioned before that our laundry room is part of a fairly recent addition to the back of the house. We’re not 100% but we’re pretty sure the previous owner went DIY on this additional square footage. Which we love, but things were exactly even. Every single wall was different height. Using Young House’s formula was not going to work for us. Instead, we made it as simple as possible. We took the height (80″ )and divided by how many stripes we wanted (12) to figure out the height of each stripe (80/12= 6.6).
I had also noticed that all of the blogs I frequent kept going on and on about this “Frog Tape”. 
With all of the lines taped up, I spent a snow day and used a 4″ roller to fill- in all the stripes with Khaki Tuape. Sherri and John at Young House reccommended taking the tape off as soon as you finished with a wall, before the paint even dried. 
I’ll have to admit the Frog tape and it’s chemical blockers did a nice job of keeping the paint from running. But when I ran out, I used regular old blue painter’s tape and had just as much success. So, after 1 gallon of primer, 4 gallons of paint, and a couple of snow days, we had a fresh, updated laundry room! 
So there you have it. One annoying laundry room transformed into a place that doesn’t annoy me! There are still some minor changes to be made. But as always, you’ll have to check back to see what I’m talking about! 😉


What an effort and what a success!
Thanks B!!! That was only half of the story. I’ll have to tell you about how the washer rebelled after the “lime mousse” went up.
Looks great! How did you like he Kilz brand paint? I have only used their primer.
It was okay for what I was doing. I wouldn’t use it for large spaces or a space that many people would see. It just wasn’t as good of quality as the Valspar or Porter that I have used before.
It looks amazing! Can I come over and wash my clothes in your much prettier laundry room? =]
LOL! Thanks!
Pingback: “Renewing the Back Bath”- Part 1 « Living On Lynnwood